
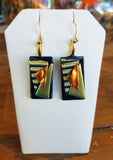
Glass Earrings #3
Glass Earrings
Out of stock
Jewelry
Glass Earrings
Share: Get $20 for every friend who join us & makes a purchase!


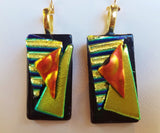
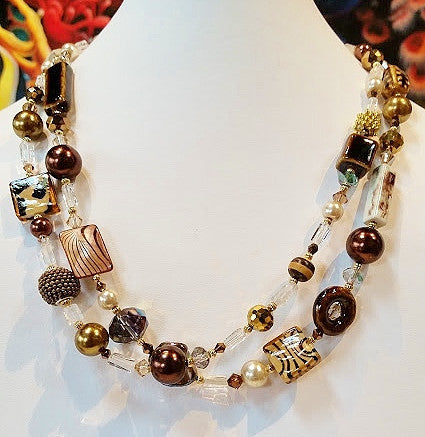
Kiln fired dichroic glass earrings, gold bails. Measures 1/4 x 1 inches
MY DICHROIC GLASS PROCESS
When working with glass, first, I have to think of the colors and design that I want. I have to fit them together like a puzzle piece! All the glass must either be COE 90 or COE 96, which is the coefficient of expansion. If the COE does not match, the glass will not fire and melt together. Luckily there are only 2 types for dichroic glass! First, I cut my base glass shape, whether I decide to make a square, rectangle, triangle, little square earrings… etc. Then I begin my design. To cut the glass, I first score it with a glass cutter from side to side, then use running pliers to make the actual cut. With some pieces, I make sure the top dichroic glass fits just right on the base glass. With others, I make overlapping glass on top of the base glass or stack the glass on top of each other, like layers. This all depends on the design I am trying to make.
Next, I decide my firing schedule and type. I love what’s called a Tack fire. A Tack fire is slightly lighter than a full fuse fire, and simply "tacks" the various glass pieces together, but does not fully melt them into each other. With tack firing, you can still see the individual pieces of glass I laid out originally, and the texture is maintained as well. It is more of a rough fire, but it doesn’t dim the colors in the glass as much, and since I love color I use it quite often! When I tack fuse pieces, I ramp my kiln up to 1350 degrees at the highest temperature point. I use 6 firing steps in this ramp. Tack pieces can be cooled a bit more quickly than full fuse as the firing temperature is not as high, although it does still take several hours. If I do a full fuse fire, the glass pieces melt together completely and more smoothly. I might decide to do one, two, or even a three layer piece on a full fuse fire and each one comes out differently depending on how the glass melts. The outcome also depends on whether or not I use clear glass to separate my layers and show some depth. The highest temperature I put this fire up to is 1550 degrees, which varies slightly depending on the amount of layers I use. I fuse pieces with this ramp schedule in 8 steps. When full fusing, I found it is even more important to gradually lower the temperature over several hours to avoid the glass cracking. Unfortunately, I learned this the hard way when I first started making glass!
After I’ve fired a load of pieces, I use a Dremel rotary tool to round off the sides and corners as they melt down into a point most of the time after I fire them. I want to make sure my pieces are not sharp! I also sand down the back of each piece so they are comfortable to wear against bare skin when needed. After this is complete I also do a final "fire polish" which is a kiln technique I use that quickly heats the glass just to the point that the top layer is heated and "polished". This gives the pieces a nice sheen to them, and eliminates any of the grinding marks on the corners made by the rotary tool that you can especially see when sanding down the black glass.
Finally, I use a silver or gold bail on each piece, whether turning them into earrings or a pendant necklace. For my glass bracelets, I wire wrap them with silver or gold aluminum. I use 12 gauge to create the bracelet base, then use 18 gauge aluminum to wrap the piece and make sure it holds to the base. The smaller the gauge, the thicker the aluminum wire, so 12 gauge makes for a perfect flexible bracelet base that will not bend or break. I use E6000 glass glue for my bails. I clean the bail with rubbing alcohol, then glue it to the piece from the upright side I think looks best as the top. These have to set for 24 hours, then be baked in the oven for extra security at 350 degrees for 25 minutes. This really sets the glue in place.
Returns Policy
You may return most new, unopened items within 30 days of delivery for a full refund. We'll also pay the return shipping costs if the return is a result of our error (you received an incorrect or defective item, etc.).
You should expect to receive your refund within four weeks of giving your package to the return shipper, however, in many cases you will receive a refund more quickly. This time period includes the transit time for us to receive your return from the shipper (5 to 10 business days), the time it takes us to process your return once we receive it (3 to 5 business days), and the time it takes your bank to process our refund request (5 to 10 business days).
If you need to return an item, simply login to your account, view the order using the 'Complete Orders' link under the My Account menu and click the Return Item(s) button. We'll notify you via e-mail of your refund once we've received and processed the returned item.
Shipping
We can ship to virtually any address in the world. Note that there are restrictions on some products, and some products cannot be shipped to international destinations.
When you place an order, we will estimate shipping and delivery dates for you based on the availability of your items and the shipping options you choose. Depending on the shipping provider you choose, shipping date estimates may appear on the shipping quotes page.
Please also note that the shipping rates for many items we sell are weight-based. The weight of any such item can be found on its detail page. To reflect the policies of the shipping companies we use, all weights will be rounded up to the next full pound.
Related Products

$ 25.00
$ 40.00
$ 105.00
$ 105.00
$ 105.00
$ 105.00